Showing posts with label Breakfast. Show all posts

Saturday, 17 December 2016

Eggless whole wheat cinnamon rolls


Made these cinnamon rolls for my son's short break at school. These are eggless and 100% whole wheat. If good quality yeast is used, the results would be just amazing.
Here is the recipe

Recipe Adapted from: divyascookbook.
Ingredients to make around 16 rolls

IngredientsQuantityNotes/Comments
Wheat Flour1 3/4 + 1/4 cupsI used aashirvad aata
Gluten2 tbspOptional but highly recommended as it gives softness to whole wheat bread.
Milk1 cupSoy milk for vegan option
Instant Yeast1 tspI used gloripan yeast
Oil1/4 cupI used sunflower oil
Sugar1/4 cup
Baking Soda1/4 tsp
Baking Powder1/4 tsp
Salt1/4 tsp
Ground Cinnamon1/2 tsp
Brown Sugar1/3 cupI used demerara sugar
Tutti fruiti1/3 cup

Procedure

1.In a saucepan mix together milk,sugar and oil.Bring to boil and then switch off the flame.Let cool down to lukewarm.
2. In another bowl, mix 1 3/4 cup of wheat flour and gluten.
3. Once the milk is lukewarm, add yeast and wheat flour mixture and mix well with a wooden spoon. 4. Cover with a lid and allow it to rise for an hour till it doubles in size. (Since we are using wheat flour, it might not double. If the weather is cold, then it might take more time for the dough to rise)
5. Once the dough has risen, add baking soda, baking powder, salt and remaining 1/4 cup wheat flour and mix well till the dough is smooth. If required, little bit milk can be added. The dough should not be very sticky.
6. If using later, refrigerate the dough. Else, roll the dough into rectangular shape.
7. Apply some oil on the rolled dough.
8. Mix cinnamon and brown sugar and spread over the rolled dough.
9. Then spread the tutti fruiti. Choco chips can be used instead of tutti fruiti.
10.Start from the opposite end of the dough, roll the dough neatly in a line towards you. Roll as tightly as possible.
11. Cut the rolled dough into 16 equal rolls and place it in a baking pan.
12. Allow it to rise for another 45 minutes to 1 hour.
13. Around 5 minutes before the final rise, pre heat the oven to 180 degree C and bake the rolls for 20 to 25 minutes.
14. Allow the rolls to cool and serve.

If refrigerated, the rolls would stay for up to 5 days or a week. If refrigerating, microwave for 30 to 45 seconds before serving.

Tuesday, 17 February 2015

100% Whole wheat Vegan buns


After a long break, here I am with a recipe for 100% whole wheat bread. I generally bake them on Sundays and pack for my son's breakfast, the next 3 days. With creamy onion and tomato spread and carrot toppings, these soft and fluffy buns are very filling and healthy as well.. Though they don't taste exactly like white bread, we have got used to the taste of wheat in baked goods and I no longer use all purpose flour/maida.
Here is the recipe

Recipe Adapted from: vegrecipesofindia.
Ingredients to make around 9 medium sized buns

IngredientsQuantityNotes/Comments
Wheat Flour2 3/4 cupsI used aashirvad aata
Gluten2 tbspOptional but highly recommended as it gives softness to whole wheat bread.
Water1 1/4 cupsMight need extra 1 or tbsps
Instant Yeast1/2 tbspI used gloripan yeast
Oil2 tbspI used sunflower oil
Sugar1 tbsp-
Salt1 tspI used sunflower refined oil

Procedure

1. Heat 1 1/4 cups of water. If its too hot, wait till it comes to lukewarm. (If the water it hot, yeast wouldn't work as expected.)
2. Dissolve sugar in water, then add yeast to it. (If using instant yeast, it can be added directly to flour, but I followed this procedure)
3. While the yeast is proofing, in a large bowl, mix flour, gluten and salt. The add oil and mix.
4. Add the yeast mixture to flour and start kneading. If the dough is too stiff, add 1 or 2 tbsp more water.
5. Knead for 5 to 7 minutes till the dough becomes smooth and soft.
6. Grease the dough with oil and transfer to a large bowl. Cover loosely with kitchen towel and allow it to rise for 1 to 1 1/2 hours. (I generally place the bowl inside the oven, of course without switching it on)
7. With wheat flour, the dough does not doubles up, but raises to some extent.
8. After 1 1/2 hours, deflate the dough by punching it and divide into 9 equal sized balls.
9. Shape the dough to desired shape(round, rectangular etc) and arrange them in the baking tray.
10. Allow them to raise again for 45 minutes to 1 hour. Apply oil lightly on the top of the buns.
11. Preheat the oven to 200 degree C and bake the buns for 25 minutes.
12. Allow them to cool a bit before slicing.

Enjoy with jam or any savory spread.


Sunday, 28 July 2013

Potato and sweet corn sandwich(no cheese/butter)


This potato-sweet corn sandwich is very easy to put together if the chutneys are made before hand. On the day of making the sandwich, prepare the potato-sweet corn filling, assemble everything and toast. You get a tangy and spicy sandwich perfect for breakfast and picnics.

The quantity of chilli added in green chutney gives us that extra heat. But if you like spicy food, you may have to add more chillies.

Recipe Source: Got the recipe for potato sweet corn filling from my cousin's space.
Ingredients to make 8 sandwiches (using 16 bread slices)

IngredientsQuantityNotes/Comments
Bread slice16I used whole wheat bread
Green chutney1 tbsp-
Onion and Tomato chutney3 tbsp-
Potato3medium sized
Sweet corn1-
Oil1 tspI used sunflower refined oil
Cumin Seeds1 tsp -
SaltTo tastearound 1/2 a tsp
Aamchur/Dry mango Powder1 tspOptional, for extra tang
Red chilli powder1/2 tsp -
lemon juice1 tsp -

Procedure
For the potato sweet corn filling
1. Pressure cook potato and sweet corn for 3 whistles
2. Peel the potato and mash. Remove kernels from the corn.
3. In a pan/kadai, add a tsp of oil. Add cumin seeds, chilli powder, aamchur powder and salt. Add corn kernels and mix well
4. Add mashed potato and lemon juice and mix well. Switch off the flame.
5. Transfer to a bowl.
For the sandwich
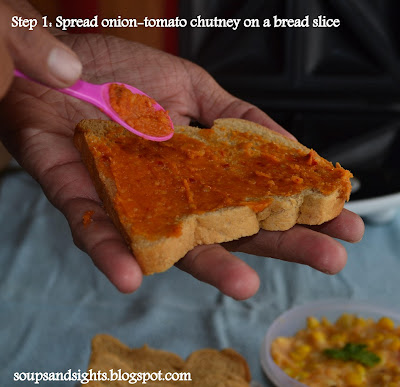
1. Spread onion chutney on a bread slice.
2. Apply green chutney on another slice. Spread the filling on the same slice.
 3. Place one slice over the other. 4. Toast in a toaster until browned.
 5. Server as it is or with tomato ketchup. As you can see, the sandwich is almost oil less and there is  no butter or cheese. The best part is you won't even miss them.

Take a slice of this sandwich and you would know the meaning of "bursting with flavour". :-)

Still not clear???? Scroll down for step wise pictures...


Monday, 9 July 2012

Sabudana Kichdi (that is not sticky)


Sabudana kichdi is a maharashtrian fasting food. In our house, it has become a regular breakfast item, eversince I came across this recipe to make sabudana kichdi that is not STICKY. The secret lies in draining the soaked sabudna and leaving it in a colander overnight or upto 8 hours.
Generally, boiled potatoes and grated coconut are added to the kichdi and garnished with coriander leaves. Going by my motto of spending as little time as possible in the kitchen, I use just 5 ingredients to make the kichdi with just a teaspoon of oil. Nevertheless, the kichdi tastes great even in its simplest form.

Here is the recipe to serve 3 adults.

Recipe Adapted from: MumbaiMagic
Ingredients
Quantity
Notes/Comments
Sabudana/javvarisi1 1/2 cupsMost of the recipes for the kichdi states that sabudana should be of very good quality. I get only the variety that is seen in my photos and it works well for me.
Peanut
1/2 cupTo be dry roasted and coarsely powdered
Boiled Potato1Optional. If using boil and cut into small pieces
Cumin Seeds/Jeera1/2 tsp-
Dry Mango Powder/Aamchur powder1 tsp-
Refined Oil1 tspI use sunflower oil
Green chily1more can be used based upon the spice level required. We prefer ours with very less spice. I did not have green chily, so used red chily.
Salt1 tspI used around 1 tsp
Grated coconut1 tbspOptional for garnish
Coriander leaves1/2 cupOptional for garnish

The soaking part has to be done atleast 8 hours before actually making the kicdi so that there is enough time to leave the soaked sabudana in a colander. I generally make this for breakfast. So, the previous night at 8, I soak the sabudana. At 10, I transfer to a colander. The next day morning at 7 or 8 I make the kichdi..
Procedure
1. Wash sabudna and transfer to a broad vessel.
2. Soak the washed sabudana in water until it is just immersed. I added 1/2 cup of water.
3. After 2 hours, transfer the soaked sabudana to a colander. Close it with a lid and leave it alone overnight.
4. Dry roast the peanuts and allow it to cool. This can be done much ahead and stored in a air tight container.
5. Once peanut is cooled, transfer it to a mixer jar and pulse just for 2 seconds. (We want coarsely powdered peanuts)
6. In a kadai/pan, add a tsp of oil. Once oil is hot, in medium flame, add cumin seeds and the chily.
7. Add aamchur powder and salt. (If using potatoes, add now)
8. Add the peanut powder and mix well. (If using potatoes, add now)
9. Finally add the sabudana.
10. Keep the flame in low/medium and mix every now and then.(Otherwise, sabudana at the bottom of the pan can get burnt.)
11. After around 10 to 15 minutes, the sabudan would turn translucent from white.
12. At this stage, put of the flame and transfer the kichdi to a serving bowl.
Optionally garnish with grated coconut and coriander leaves.

Still not clear???? Scroll down for step wise pictures...